
Truck-Lite Signal Stat 900 Warning Switch Instruction Manual

Truck-Lite Signal Stat 900 Warning Switch




Truck-Lite Signal Stat 900 Instructions
Here we offer the Truck-Lite Signal Stat 900 Warning Switch manual completely free and in English. We have cataloged this manual in the Warning Switches section on Manualverse, and it has been rated by 1 users with an average rating of 5. If you have any specific questions about Truck-Lite Signal Stat 900 Warning Switch, we suggest checking the Frequently Asked Questions (FAQs) section of this manual.
Product Images


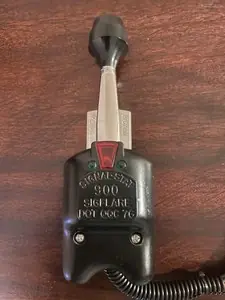
Truck-Lite Signal Stat 900 Warning Switch Specifications
| Feature | Specification |
|---|---|
| Manufacturer | Truck-Lite Co., LLC (Signal-Stat brand) |
| Product Series | Signal-Stat Series 900 Switch |
| Covered Models | 900, 901, 902, 903, 905, 910 |
| Functions | Turn signals, hazard warning flare, Hi/Lo beam selection (Model 905 only) |
| Mounting | Steering column, strap and clip with anchor screws |
| Grounding | Metal-to-metal contact under mounting strap |
| Pilot Lights | Green (left and right turn), red (flare/hazard) |
| Pilot Bulb, 6 V Service | #51 |
| Pilot Bulb, 12 V Service | #53 |
| Pilot Bulb, 24 V Service | #356 |
| Recommended Flasher | 3-terminal (P = Pilot, L = Load, X = Power); not included |
| Flasher Socket | Not included |
| Wire Color: Red | Power to battery (via fuse) |
| Wire Color: Blue | Flasher "P" (Pilot) |
| Wire Color: Yellow | Flasher "L" (Load) |
| Wire Color: Grey/Black | Stop light switch |
| Wire Colors: Black / Grey | Right / left stop light filament (Models 900, 901, 910) |
| Hi/Lo Beam Wiring (Model 905) | White, White/Green, Purple, Yellow/Black; relay terminals 30, 85, 87, 87A |
| Replacement Handle with Hi-Lo Beam Switch | Part# 9191 |
| Replacement Standard Handle | Part# 9196 |
| Replacement Mounting Hardware Kit | Part# 9190 |
| Ground Polarity | Compatible with negative and positive ground vehicles |
| Instruction Sheet | Part 30493, Dwg 46361a |
| Quality Certification | IATF-16949 / ISO9001 company |
| Technical Support | (888) 562-5012, tltech@truck-lite.com |
| Customer Service | (800) 562-5012, customerservice@truck-lite.com |
Truck-Lite Signal Stat 900 Details
The Truck-Lite Signal-Stat Series 900 switch clamps onto the steering column and combines turn signals with a hazard warning function. To signal a turn, move the handle in the direction of the turn and the green pilot light flashes to show the circuit is working. If the pilot light does not flash, check for a failed lamp or pilot bulb before suspecting the flasher.
The hazard function is called the flare. With the handle in neutral, pull the flare tab out. All signal lamps and the red pilot light then flash for all-around vehicle protection. To cancel it, move the handle left or right and the tab releases automatically. Then return the handle to neutral. On Model 905, pushing the handle button switches between high and low beams, and pushing it again returns to regular headlights.
One important caution concerns the power lead. It must connect to a line that stays hot when the ignition is off. Otherwise the hazard warning will not work while the engine is stopped. Truck-Lite also tells installers on new installations or major conversions to source the correct flasher and any associated hardware, because neither the flasher nor the flasher socket comes with the switch.
Mounting takes six steps. Insert the screws into the anchors and fit them into the switch slots without tightening. Bend the strap end around a clip and engage the clip between the anchor and the housing. Hold the switch on the column, wrap the strap around it, and scrape off the paint under the strap for a good ground. Cut the strap to length, fit the second clip, and tighten the screws evenly.
To change a pilot bulb, remove two screws and lift off the top cover. Pull the spring clip away from the handle to free the socket and bulb assembly, fit the new bulb, and snap the assembly back in. Do not test the new bulb until the switch is reassembled and grounded. During wiring, remove the flasher and refit it only after all connections are checked. Tape the ends of any unused wires to prevent shorts.
For Model 905, wire the turn signal and hazard circuits first. Then disconnect the battery ground cable before wiring the headlight relay circuit, and reconnect the cable afterwards. The instruction sheet covers several common faults. If nothing works, the cause is usually a poor ground, wrong wire colors or a short at a splice. A pilot light that stays on usually means the blue and yellow wires are touching.
If the hazards flash but the turn signals do not, improve the strap-to-column ground. Also suspect the flasher: 6 V flashers are fragile and are often damaged in shipping. Systems with separate hazard and turn flashers can be adapted in two ways. You can jumper both flashers' "L" terminals, or you can route everything through a single flasher. Painless Wiring harnesses need a jumper plus a 3-terminal flasher, with harness wire #952 supplying power.
A 2-terminal flasher will work, but the indicator lights will not. On Wagner and Tridon flashers, the terminals are labeled B (battery), L (load) and E (pilot). If both rear brake lamps come on together, the left and right lamps must be put on separate circuits. LED lamps need a solid-state flasher designed for LEDs. The serviceman should give the instruction sheet to the vehicle owner.
Frequently Asked Questions (FAQs)
Can't find the answer you need? Here are some frequently asked questions about the Truck-Lite Signal Stat 900 Warning Switch, and we answer them below.